> ## Documentation Index
> Fetch the complete documentation index at: https://portkey-docs-add-third-party-integration-issues-fixes.mintlify.site/llms.txt
> Use this file to discover all available pages before exploring further.
# OpenAI
> Learn to integrate OpenAI with Portkey, enabling seamless completions, prompt management, and advanced functionalities like streaming, function calling and fine-tuning.
Portkey has native integrations with OpenAI SDKs for Node.js, Python, and its REST APIs. For OpenAI integration using other frameworks, explore our partnerships, including [Langchain](/integrations/libraries/langchain-python), [LlamaIndex](/integrations/libraries/llama-index-python), among [others](/integrations/llms).
Provider Slug. `openai`
## Using the Portkey Gateway
To integrate the Portkey gateway with OpenAI,
* Set the `baseURL` to the Portkey Gateway URL
* Include Portkey-specific headers such as `provider`, `apiKey`, 'virtualKey' and others.
Here's how to apply it to a **chat completion** request:
Install the Portkey SDK with npm
```sh theme={null}
npm install portkey-ai
```
```ts Chat Completions theme={null}
import Portkey from 'portkey-ai';
const client = new Portkey({
apiKey: 'PORTKEY_API_KEY',
virtualKey: 'PROVIDER_VIRTUAL_KEY'
});
async function main() {
const response = await client.chat.completions.create({
messages: [{ role: "user", content: "Bob the builder.." }],
model: "gpt-4o",
});
console.log(response.choices[0].message.content);
}
main();
```
Install the Portkey SDK with pip
```sh theme={null}
pip install portkey-ai
```
```py Chat Completions theme={null}
from portkey_ai import Portkey
client = Portkey(
api_key = "PORTKEY_API_KEY",
virtual_key = "PROVIDER_VIRTUAL_KEY"
)
response = client.chat.completions.create(
model="gpt-4o",
messages=[
{"role": "system", "content": "You are a helpful assistant."},
{"role": "user", "content": "Hello!"}
]
)
print(response.choices[0].message)
```
```sh Chat Completions theme={null}
curl https://api.portkey.ai/v1/chat/completions \
-H "Content-Type: application/json" \
-H "x-portkey-api-key: $PORTKEY_API_KEY" \
-H "x-portkey-virtual-key: $PORTKEY_PROVIDER_VIRTUAL_KEY" \
-d '{
"model": "gpt-4o",
"messages": [
{ "role": "user", "content": "Hello!" }
]
}'
```
Install the OpenAI & Portkey SDKs with pip
```sh theme={null}
pip install openai portkey-ai
```
```py Chat Completions theme={null}
from openai import OpenAI
from portkey_ai import createHeaders, PORTKEY_GATEWAY_URL
client = OpenAI(
api_key="xx",
base_url=PORTKEY_GATEWAY_URL,
default_headers=createHeaders(
api_key="PORTKEY_API_KEY",
virtual_key="OPENAI_VIRTUAL_KEY"
)
)
completion = client.chat.completions.create(
model="gpt-4o",
messages=[
{"role": "system", "content": "You are a helpful assistant."},
{"role": "user", "content": "Hello!"}
]
)
print(completion.choices[0].message)
```
Install the OpenAI & Portkey SDKs with npm
```sh theme={null}
npm install openai portkey-ai
```
```ts Chat Completions theme={null}
import OpenAI from 'openai';
import { PORTKEY_GATEWAY_URL, createHeaders } from 'portkey-ai'
const openai = new OpenAI({
apiKey: 'xx',
baseURL: PORTKEY_GATEWAY_URL,
defaultHeaders: createHeaders({
apiKey: "PORTKEY_API_KEY",
virtualKey: "OPENAI_VIRTUAL_KEY"
})
});
async function main() {
const completion = await openai.chat.completions.create({
messages: [{ role: 'user', content: 'Say this is a test' }],
model: 'gpt-4o',
});
console.log(chatCompletion.choices);
}
main();
```
This request will be automatically logged by Portkey. You can view this in your logs dashboard. Portkey logs the tokens utilized, execution time, and cost for each request. Additionally, you can delve into the details to review the precise request and response data.
Portkey supports [OpenAI's new "developer" role](https://platform.openai.com/docs/api-reference/chat/create#chat-create-messages) in chat completions. With o1 models and newer, the `developer` role replaces the previous `system` role.
### Using the Responses API
OpenAI has released a new Responses API that combines the best of both Chat Completions and Assistants APIs. Portkey fully supports this new API, enabling you to use it with both the Portkey SDK and OpenAI SDK.
```python theme={null}
from portkey_ai import Portkey
portkey = Portkey(
api_key="PORTKEY_API_KEY",
virtual_key="OPENAI_VIRTUAL_KEY"
)
response = portkey.responses.create(
model="gpt-4.1",
input="Tell me a three sentence bedtime story about a unicorn."
)
print(response)
```
```js theme={null}
import Portkey from 'portkey-ai';
const portkey = new Portkey({
apiKey: "PORTKEY_API_KEY",
virtualKey: "OPENAI_VIRTUAL_KEY"
});
async function main() {
const response = await portkey.responses.create({
model: "gpt-4.1",
input: "Tell me a three sentence bedtime story about a unicorn."
});
console.log(response);
}
main();
```
```python theme={null}
from openai import OpenAI
from portkey_ai import PORTKEY_GATEWAY_URL, createHeaders
client = OpenAI(
api_key="OPENAI_API_KEY",
base_url=PORTKEY_GATEWAY_URL,
default_headers=createHeaders(
provider="openai",
api_key="PORTKEY_API_KEY",
virtual_key="OPENAI_VIRTUAL_KEY"
)
)
response = client.responses.create(
model="gpt-4.1",
input="Tell me a three sentence bedtime story about a unicorn."
)
print(response)
```
```js theme={null}
import OpenAI from 'openai';
import { PORTKEY_GATEWAY_URL, createHeaders } from 'portkey-ai'
const openai = new OpenAI({
baseURL: PORTKEY_GATEWAY_URL,
defaultHeaders: createHeaders({
provider: "openai",
apiKey: "PORTKEY_API_KEY",
virtualKey: "OPENAI_VIRTUAL_KEY"
})
});
async function main() {
const response = await openai.responses.create({
model: "gpt-4.1",
input: "Tell me a three sentence bedtime story about a unicorn."
});
console.log(response);
}
main();
```
The Responses API provides a more flexible foundation for building agentic applications with built-in tools that execute automatically.
Portkey supports Remote MCP support by OpenAI on it's Responses API. Learn More
## Track End-User IDs
Portkey allows you to track user IDs passed with the `user` parameter in OpenAI requests, enabling you to monitor user-level costs, requests, and more.
```js theme={null}
const chatCompletion = await portkey.chat.completions.create({
messages: [{ role: "user", content: "Say this is a test" }],
model: "gpt-4o",
user: "user_12345",
});
```
```py theme={null}
response = portkey.chat.completions.create(
model="gpt-4o",
messages=[{ role: "user", content: "Say this is a test" }]
user="user_123456"
)
```
When you include the `user` parameter in your requests, Portkey logs will display the associated user ID, as shown in the image below:
 In addition to the `user` parameter, Portkey allows you to send arbitrary custom metadata with your requests. This powerful feature enables you to associate additional context or information with each request, which can be useful for analysis, debugging, or other custom use cases.
* The same integration approach applies to APIs for [completions](https://platform.openai.com/docs/guides/text-generation/completions-api), [embeddings](https://platform.openai.com/docs/api-reference/embeddings/create), [vision](https://platform.openai.com/docs/guides/vision/quick-start), [moderation](https://platform.openai.com/docs/api-reference/moderations/create), [transcription](https://platform.openai.com/docs/api-reference/audio/createTranscription), [translation](https://platform.openai.com/docs/api-reference/audio/createTranslation), [speech](https://platform.openai.com/docs/api-reference/audio/createSpeech) and [files](https://platform.openai.com/docs/api-reference/files/create).
* If you are looking for a way to add your **Org ID** & **Project ID** to the requests, head over to [this section](/integrations/llms/openai#managing-openai-projects-and-organizations-in-portkey).
## Using the Prompts API
Portkey also supports creating and managing prompt templates in the [prompt library](/product/prompt-library). This enables the collaborative development of prompts directly through the user interface.
1. Create a prompt template with variables and set the hyperparameters.
In addition to the `user` parameter, Portkey allows you to send arbitrary custom metadata with your requests. This powerful feature enables you to associate additional context or information with each request, which can be useful for analysis, debugging, or other custom use cases.
* The same integration approach applies to APIs for [completions](https://platform.openai.com/docs/guides/text-generation/completions-api), [embeddings](https://platform.openai.com/docs/api-reference/embeddings/create), [vision](https://platform.openai.com/docs/guides/vision/quick-start), [moderation](https://platform.openai.com/docs/api-reference/moderations/create), [transcription](https://platform.openai.com/docs/api-reference/audio/createTranscription), [translation](https://platform.openai.com/docs/api-reference/audio/createTranslation), [speech](https://platform.openai.com/docs/api-reference/audio/createSpeech) and [files](https://platform.openai.com/docs/api-reference/files/create).
* If you are looking for a way to add your **Org ID** & **Project ID** to the requests, head over to [this section](/integrations/llms/openai#managing-openai-projects-and-organizations-in-portkey).
## Using the Prompts API
Portkey also supports creating and managing prompt templates in the [prompt library](/product/prompt-library). This enables the collaborative development of prompts directly through the user interface.
1. Create a prompt template with variables and set the hyperparameters.
 2. Use this prompt in your codebase using the Portkey SDK.
```js theme={null}
import Portkey from 'portkey-ai'
const portkey = new Portkey({
apiKey: "PORTKEY_API_KEY",
})
// Make the prompt creation call with the variables
const promptCompletion = await portkey.prompts.completions.create({
promptID: "Your Prompt ID",
variables: {
// The variables specified in the prompt
}
})
```
```js theme={null}
// We can also override the hyperparameters
const promptCompletion = await portkey.prompts.completions.create({
promptID: "Your Prompt ID",
variables: {
// The variables specified in the prompt
},
max_tokens: 250,
presence_penalty: 0.2
})
```
```python theme={null}
from portkey_ai import Portkey
client = Portkey(
api_key="PORTKEY_API_KEY", # defaults to os.environ.get("PORTKEY_API_KEY")
)
prompt_completion = client.prompts.completions.create(
prompt_id="Your Prompt ID",
variables={
# The variables specified in the prompt
}
)
print(prompt_completion)
# We can also override the hyperparameters
prompt_completion = client.prompts.completions.create(
prompt_id="Your Prompt ID",
variables={
# The variables specified in the prompt
},
max_tokens=250,
presence_penalty=0.2
)
print(prompt_completion)
```
```sh theme={null}
curl -X POST "https://api.portkey.ai/v1/prompts/:PROMPT_ID/completions" \
-H "Content-Type: application/json" \
-H "x-portkey-api-key: $PORTKEY_API_KEY" \
-d '{
"variables": {
# The variables to use
},
"max_tokens": 250, # Optional
"presence_penalty": 0.2 # Optional
}'
```
Observe how this streamlines your code readability and simplifies prompt updates via the UI without altering the codebase.
## Advanced Use Cases
### Realtime API
Portkey supports OpenAI's Realtime API with a seamless integration. This allows you to use Portkey's logging, cost tracking, and guardrail features while using the Realtime API.
### Streaming Responses
Portkey supports streaming responses using Server Sent Events (SSE).
```js theme={null}
import OpenAI from 'openai';
import { PORTKEY_GATEWAY_URL, createHeaders } from 'portkey-ai'
const openai = new OpenAI({
baseURL: PORTKEY_GATEWAY_URL,
defaultHeaders: createHeaders({
provider: "openai",
apiKey: "PORTKEY_API_KEY" // defaults to process.env["PORTKEY_API_KEY"]
})
});
async function main() {
const stream = await openai.chat.completions.create({
model: 'gpt-4',
messages: [{ role: 'user', content: 'Say this is a test' }],
stream: true,
});
for await (const chunk of stream) {
process.stdout.write(chunk.choices[0]?.delta?.content || '');
}
}
main();
```
```python theme={null}
from openai import OpenAI
from portkey_ai import PORTKEY_GATEWAY_URL, createHeaders
client = OpenAI(
api_key="OPENAI_API_KEY", # defaults to os.environ.get("OPENAI_API_KEY")
base_url=PORTKEY_GATEWAY_URL,
default_headers=createHeaders(
provider="openai",
api_key="PORTKEY_API_KEY" # defaults to os.environ.get("PORTKEY_API_KEY")
)
)
chat_complete = client.chat.completions.create(
model="gpt-4",
messages=[{"role": "user", "content": "Say this is a test"}],
stream=True
)
for chunk in chat_complete:
print(chunk.choices[0].delta.content, end="", flush=True)
```
#### Streaming with the Responses API
You can also stream responses from the Responses API:
```python theme={null}
response = portkey.responses.create(
model="gpt-4.1",
instructions="You are a helpful assistant.",
input="Hello!",
stream=True
)
for event in response:
print(event)
```
```js theme={null}
const response = await portkey.responses.create({
model: "gpt-4.1",
instructions: "You are a helpful assistant.",
input: "Hello!",
stream: true
});
for await (const event of response) {
console.log(event);
}
```
```python theme={null}
response = client.responses.create(
model="gpt-4.1",
instructions="You are a helpful assistant.",
input="Hello!",
stream=True
)
for event in response:
print(event)
```
```js theme={null}
const response = await openai.responses.create({
model: "gpt-4.1",
instructions: "You are a helpful assistant.",
input: "Hello!",
stream: true
});
for await (const event of response) {
console.log(event);
}
```
### Using Vision Models
Portkey's multimodal Gateway fully supports OpenAI vision models as well. See this guide for more info:
[Vision](/product/ai-gateway/multimodal-capabilities/vision)
#### Vision with the Responses API
You can also use the Responses API to process images alongside text:
```python theme={null}
response = portkey.responses.create(
model="gpt-4.1",
input=[
{
"role": "user",
"content": [
{ "type": "input_text", "text": "What is in this image?" },
{
"type": "input_image",
"image_url": "https://upload.wikimedia.org/wikipedia/commons/thumb/d/dd/Gfp-wisconsin-madison-the-nature-boardwalk.jpg/2560px-Gfp-wisconsin-madison-the-nature-boardwalk.jpg"
}
]
}
]
)
print(response)
```
```js theme={null}
const response = await portkey.responses.create({
model: "gpt-4.1",
input: [
{
role: "user",
content: [
{ type: "input_text", text: "What is in this image?" },
{
type: "input_image",
image_url: "https://upload.wikimedia.org/wikipedia/commons/thumb/d/dd/Gfp-wisconsin-madison-the-nature-boardwalk.jpg/2560px-Gfp-wisconsin-madison-the-nature-boardwalk.jpg"
}
]
}
]
});
console.log(response);
```
```python theme={null}
response = client.responses.create(
model="gpt-4.1",
input=[
{
"role": "user",
"content": [
{ "type": "input_text", "text": "What is in this image?" },
{
"type": "input_image",
"image_url": "https://upload.wikimedia.org/wikipedia/commons/thumb/d/dd/Gfp-wisconsin-madison-the-nature-boardwalk.jpg/2560px-Gfp-wisconsin-madison-the-nature-boardwalk.jpg"
}
]
}
]
)
print(response)
```
```js theme={null}
const response = await openai.responses.create({
model: "gpt-4.1",
input: [
{
role: "user",
content: [
{ type: "input_text", text: "What is in this image?" },
{
type: "input_image",
image_url: "https://upload.wikimedia.org/wikipedia/commons/thumb/d/dd/Gfp-wisconsin-madison-the-nature-boardwalk.jpg/2560px-Gfp-wisconsin-madison-the-nature-boardwalk.jpg"
}
]
}
]
});
console.log(response);
```
### Function Calling
Function calls within your OpenAI or Portkey SDK operations remain standard. These logs will appear in Portkey, highlighting the utilized functions and their outputs.
Additionally, you can define functions within your prompts and invoke the `portkey.prompts.completions.create` method as above.
#### Function Calling with the Responses API
The Responses API also supports function calling with the same powerful capabilities:
```python theme={null}
tools = [
{
"type": "function",
"name": "get_current_weather",
"description": "Get the current weather in a given location",
"parameters": {
"type": "object",
"properties": {
"location": {
"type": "string",
"description": "The city and state, e.g. San Francisco, CA"
},
"unit": {"type": "string", "enum": ["celsius", "fahrenheit"]}
},
"required": ["location", "unit"]
}
}
]
response = portkey.responses.create(
model="gpt-4.1",
tools=tools,
input="What is the weather like in Boston today?",
tool_choice="auto"
)
print(response)
```
```js theme={null}
const tools = [
{
type: "function",
name: "get_current_weather",
description: "Get the current weather in a given location",
parameters: {
type: "object",
properties: {
location: {
type: "string",
description: "The city and state, e.g. San Francisco, CA"
},
unit: { type: "string", enum: ["celsius", "fahrenheit"] }
},
required: ["location", "unit"]
}
}
];
const response = await portkey.responses.create({
model: "gpt-4.1",
tools: tools,
input: "What is the weather like in Boston today?",
tool_choice: "auto"
});
console.log(response);
```
```python theme={null}
tools = [
{
"type": "function",
"name": "get_current_weather",
"description": "Get the current weather in a given location",
"parameters": {
"type": "object",
"properties": {
"location": {
"type": "string",
"description": "The city and state, e.g. San Francisco, CA"
},
"unit": {"type": "string", "enum": ["celsius", "fahrenheit"]}
},
"required": ["location", "unit"]
}
}
]
response = client.responses.create(
model="gpt-4.1",
tools=tools,
input="What is the weather like in Boston today?",
tool_choice="auto"
)
print(response)
```
```js theme={null}
const tools = [
{
type: "function",
name: "get_current_weather",
description: "Get the current weather in a given location",
parameters: {
type: "object",
properties: {
location: {
type: "string",
description: "The city and state, e.g. San Francisco, CA"
},
unit: { type: "string", enum: ["celsius", "fahrenheit"] }
},
required: ["location", "unit"]
}
}
];
const response = await openai.responses.create({
model: "gpt-4.1",
tools: tools,
input: "What is the weather like in Boston today?",
tool_choice: "auto"
});
console.log(response);
```
### Fine-Tuning
Please refer to our fine-tuning guides to take advantage of Portkey's advanced [continuous fine-tuning](/product/autonomous-fine-tuning) capabilities.
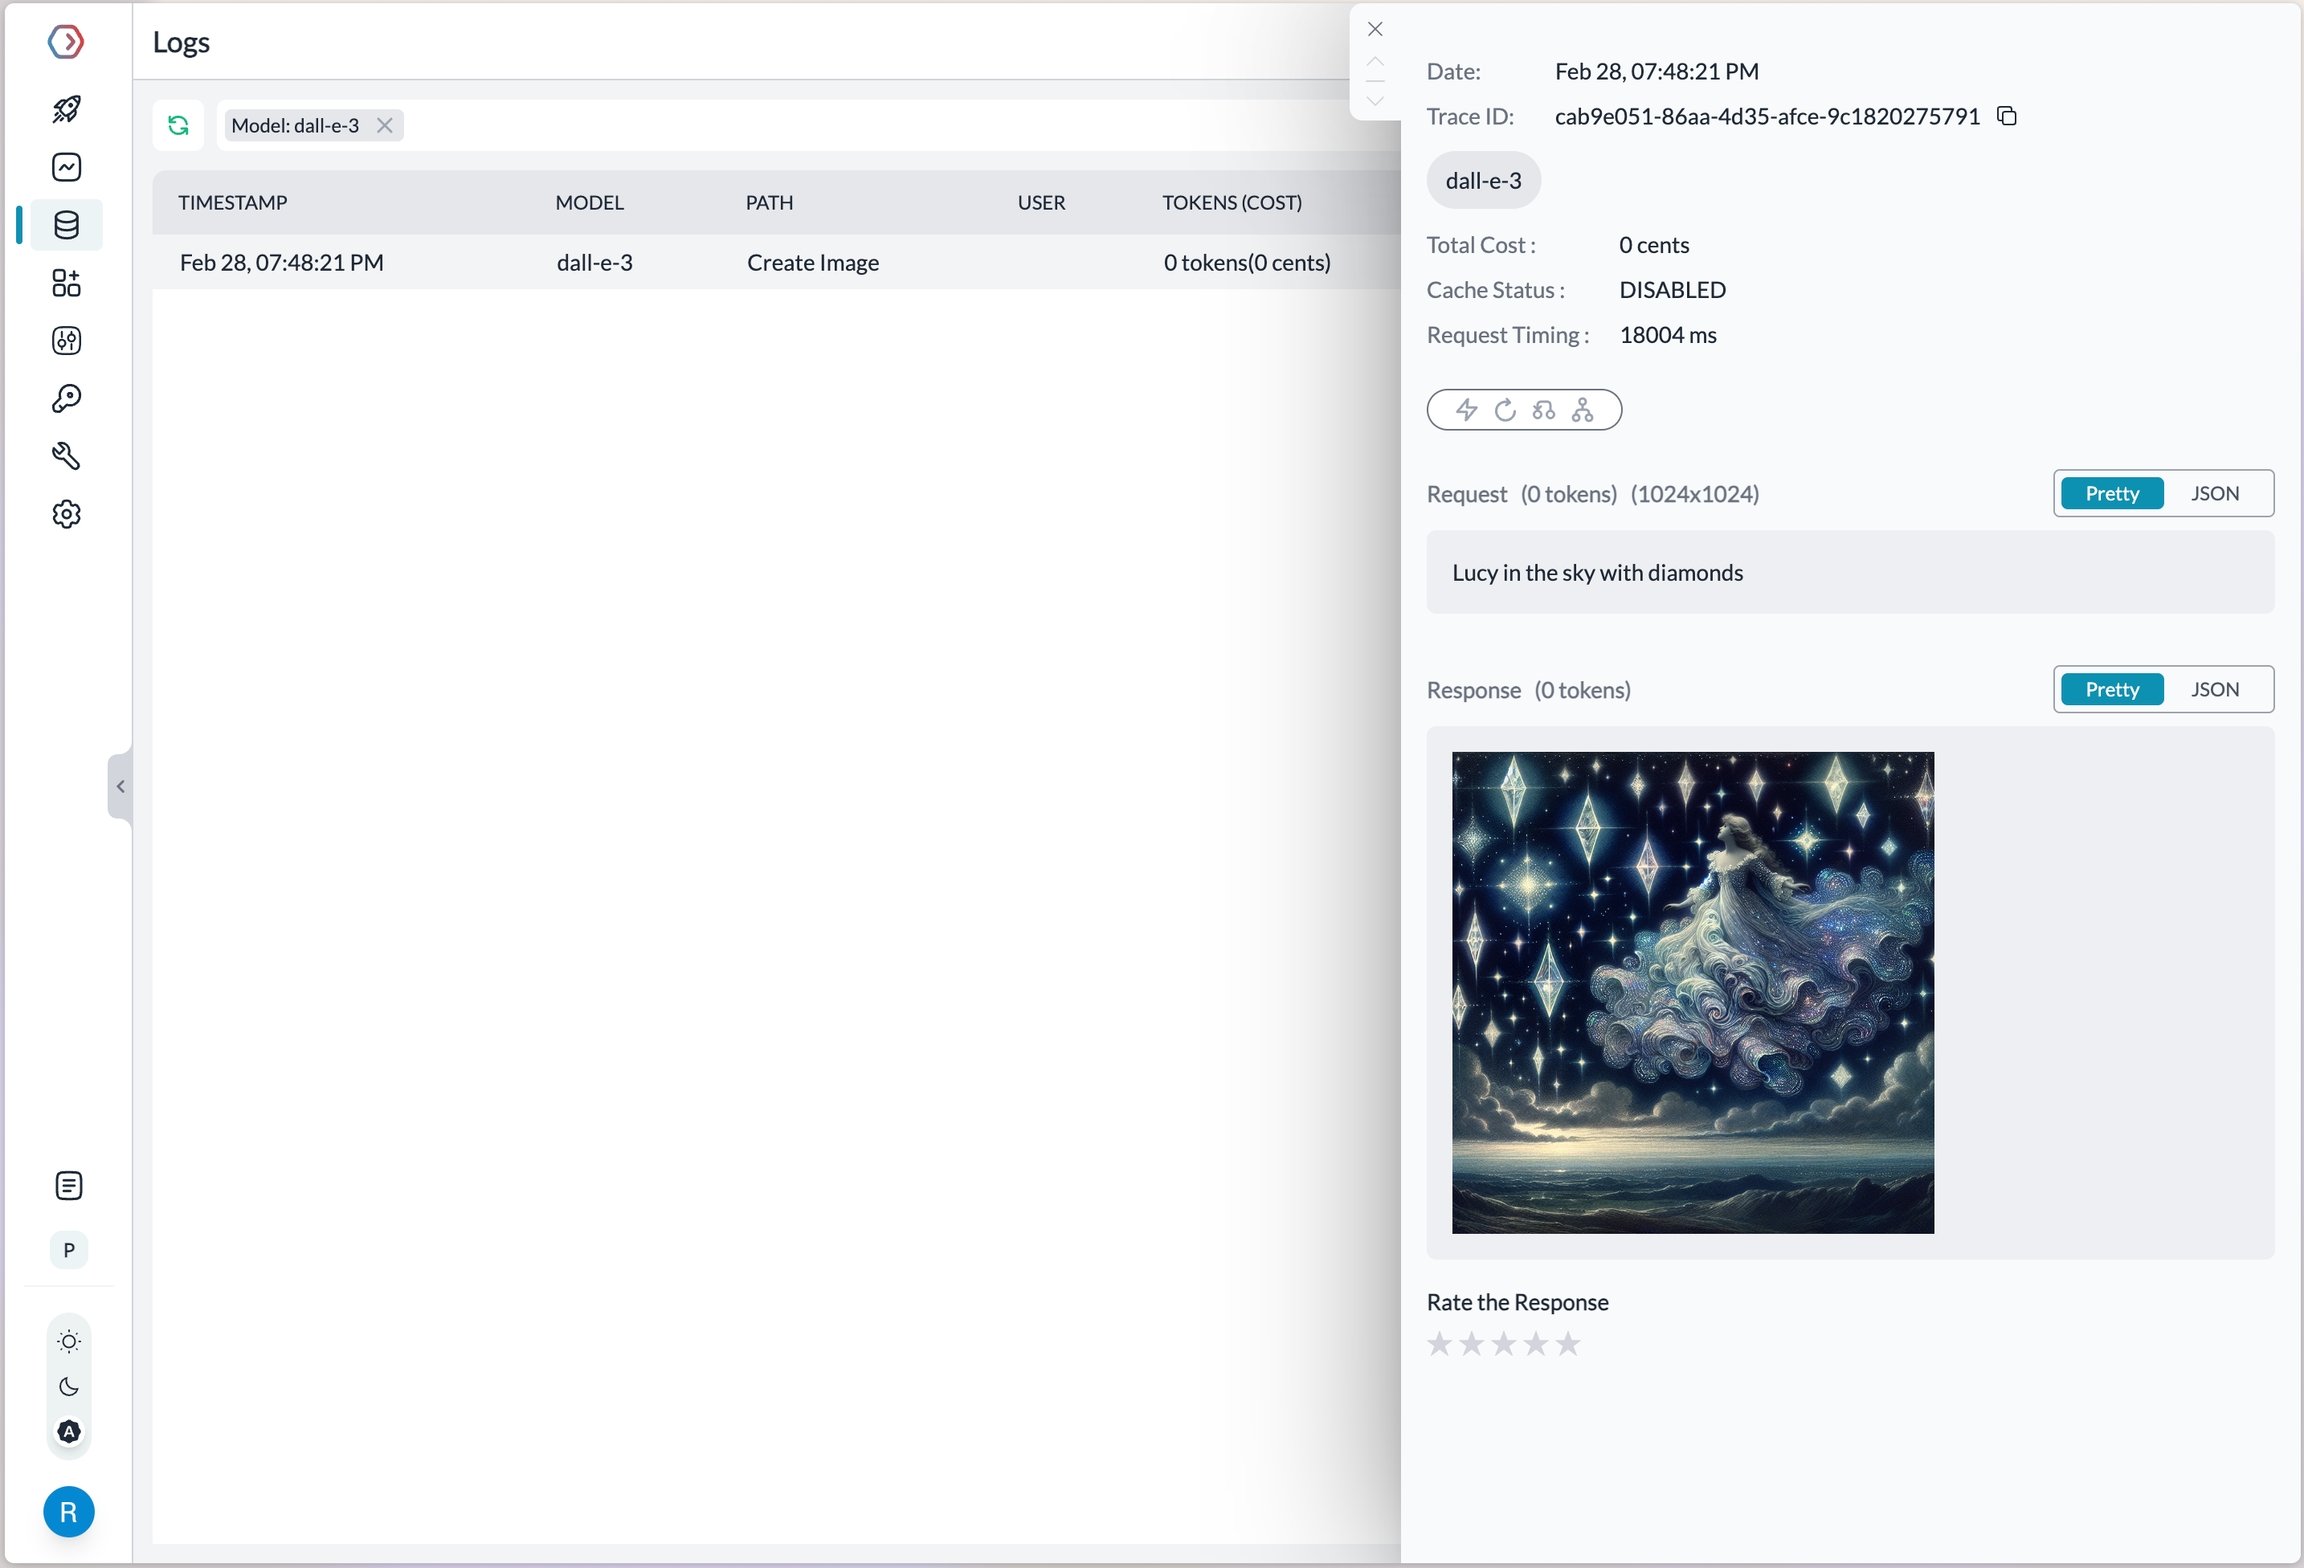
### Image Generation
Portkey supports multiple modalities for OpenAI and you can make image generation requests through Portkey's AI Gateway the same way as making completion calls.
```js theme={null}
// Define the OpenAI client as shown above
const image = await openai.images.generate({
model:"dall-e-3",
prompt:"Lucy in the sky with diamonds",
size:"1024x1024"
})
```
```python theme={null}
# Define the OpenAI client as shown above
image = openai.images.generate(
model="dall-e-3",
prompt="Lucy in the sky with diamonds",
size="1024x1024"
)
```
Portkey's fast AI gateway captures the information about the request on your Portkey Dashboard. On your logs screen, you'd be able to see this request with the request and response.
2. Use this prompt in your codebase using the Portkey SDK.
```js theme={null}
import Portkey from 'portkey-ai'
const portkey = new Portkey({
apiKey: "PORTKEY_API_KEY",
})
// Make the prompt creation call with the variables
const promptCompletion = await portkey.prompts.completions.create({
promptID: "Your Prompt ID",
variables: {
// The variables specified in the prompt
}
})
```
```js theme={null}
// We can also override the hyperparameters
const promptCompletion = await portkey.prompts.completions.create({
promptID: "Your Prompt ID",
variables: {
// The variables specified in the prompt
},
max_tokens: 250,
presence_penalty: 0.2
})
```
```python theme={null}
from portkey_ai import Portkey
client = Portkey(
api_key="PORTKEY_API_KEY", # defaults to os.environ.get("PORTKEY_API_KEY")
)
prompt_completion = client.prompts.completions.create(
prompt_id="Your Prompt ID",
variables={
# The variables specified in the prompt
}
)
print(prompt_completion)
# We can also override the hyperparameters
prompt_completion = client.prompts.completions.create(
prompt_id="Your Prompt ID",
variables={
# The variables specified in the prompt
},
max_tokens=250,
presence_penalty=0.2
)
print(prompt_completion)
```
```sh theme={null}
curl -X POST "https://api.portkey.ai/v1/prompts/:PROMPT_ID/completions" \
-H "Content-Type: application/json" \
-H "x-portkey-api-key: $PORTKEY_API_KEY" \
-d '{
"variables": {
# The variables to use
},
"max_tokens": 250, # Optional
"presence_penalty": 0.2 # Optional
}'
```
Observe how this streamlines your code readability and simplifies prompt updates via the UI without altering the codebase.
## Advanced Use Cases
### Realtime API
Portkey supports OpenAI's Realtime API with a seamless integration. This allows you to use Portkey's logging, cost tracking, and guardrail features while using the Realtime API.
### Streaming Responses
Portkey supports streaming responses using Server Sent Events (SSE).
```js theme={null}
import OpenAI from 'openai';
import { PORTKEY_GATEWAY_URL, createHeaders } from 'portkey-ai'
const openai = new OpenAI({
baseURL: PORTKEY_GATEWAY_URL,
defaultHeaders: createHeaders({
provider: "openai",
apiKey: "PORTKEY_API_KEY" // defaults to process.env["PORTKEY_API_KEY"]
})
});
async function main() {
const stream = await openai.chat.completions.create({
model: 'gpt-4',
messages: [{ role: 'user', content: 'Say this is a test' }],
stream: true,
});
for await (const chunk of stream) {
process.stdout.write(chunk.choices[0]?.delta?.content || '');
}
}
main();
```
```python theme={null}
from openai import OpenAI
from portkey_ai import PORTKEY_GATEWAY_URL, createHeaders
client = OpenAI(
api_key="OPENAI_API_KEY", # defaults to os.environ.get("OPENAI_API_KEY")
base_url=PORTKEY_GATEWAY_URL,
default_headers=createHeaders(
provider="openai",
api_key="PORTKEY_API_KEY" # defaults to os.environ.get("PORTKEY_API_KEY")
)
)
chat_complete = client.chat.completions.create(
model="gpt-4",
messages=[{"role": "user", "content": "Say this is a test"}],
stream=True
)
for chunk in chat_complete:
print(chunk.choices[0].delta.content, end="", flush=True)
```
#### Streaming with the Responses API
You can also stream responses from the Responses API:
```python theme={null}
response = portkey.responses.create(
model="gpt-4.1",
instructions="You are a helpful assistant.",
input="Hello!",
stream=True
)
for event in response:
print(event)
```
```js theme={null}
const response = await portkey.responses.create({
model: "gpt-4.1",
instructions: "You are a helpful assistant.",
input: "Hello!",
stream: true
});
for await (const event of response) {
console.log(event);
}
```
```python theme={null}
response = client.responses.create(
model="gpt-4.1",
instructions="You are a helpful assistant.",
input="Hello!",
stream=True
)
for event in response:
print(event)
```
```js theme={null}
const response = await openai.responses.create({
model: "gpt-4.1",
instructions: "You are a helpful assistant.",
input: "Hello!",
stream: true
});
for await (const event of response) {
console.log(event);
}
```
### Using Vision Models
Portkey's multimodal Gateway fully supports OpenAI vision models as well. See this guide for more info:
[Vision](/product/ai-gateway/multimodal-capabilities/vision)
#### Vision with the Responses API
You can also use the Responses API to process images alongside text:
```python theme={null}
response = portkey.responses.create(
model="gpt-4.1",
input=[
{
"role": "user",
"content": [
{ "type": "input_text", "text": "What is in this image?" },
{
"type": "input_image",
"image_url": "https://upload.wikimedia.org/wikipedia/commons/thumb/d/dd/Gfp-wisconsin-madison-the-nature-boardwalk.jpg/2560px-Gfp-wisconsin-madison-the-nature-boardwalk.jpg"
}
]
}
]
)
print(response)
```
```js theme={null}
const response = await portkey.responses.create({
model: "gpt-4.1",
input: [
{
role: "user",
content: [
{ type: "input_text", text: "What is in this image?" },
{
type: "input_image",
image_url: "https://upload.wikimedia.org/wikipedia/commons/thumb/d/dd/Gfp-wisconsin-madison-the-nature-boardwalk.jpg/2560px-Gfp-wisconsin-madison-the-nature-boardwalk.jpg"
}
]
}
]
});
console.log(response);
```
```python theme={null}
response = client.responses.create(
model="gpt-4.1",
input=[
{
"role": "user",
"content": [
{ "type": "input_text", "text": "What is in this image?" },
{
"type": "input_image",
"image_url": "https://upload.wikimedia.org/wikipedia/commons/thumb/d/dd/Gfp-wisconsin-madison-the-nature-boardwalk.jpg/2560px-Gfp-wisconsin-madison-the-nature-boardwalk.jpg"
}
]
}
]
)
print(response)
```
```js theme={null}
const response = await openai.responses.create({
model: "gpt-4.1",
input: [
{
role: "user",
content: [
{ type: "input_text", text: "What is in this image?" },
{
type: "input_image",
image_url: "https://upload.wikimedia.org/wikipedia/commons/thumb/d/dd/Gfp-wisconsin-madison-the-nature-boardwalk.jpg/2560px-Gfp-wisconsin-madison-the-nature-boardwalk.jpg"
}
]
}
]
});
console.log(response);
```
### Function Calling
Function calls within your OpenAI or Portkey SDK operations remain standard. These logs will appear in Portkey, highlighting the utilized functions and their outputs.
Additionally, you can define functions within your prompts and invoke the `portkey.prompts.completions.create` method as above.
#### Function Calling with the Responses API
The Responses API also supports function calling with the same powerful capabilities:
```python theme={null}
tools = [
{
"type": "function",
"name": "get_current_weather",
"description": "Get the current weather in a given location",
"parameters": {
"type": "object",
"properties": {
"location": {
"type": "string",
"description": "The city and state, e.g. San Francisco, CA"
},
"unit": {"type": "string", "enum": ["celsius", "fahrenheit"]}
},
"required": ["location", "unit"]
}
}
]
response = portkey.responses.create(
model="gpt-4.1",
tools=tools,
input="What is the weather like in Boston today?",
tool_choice="auto"
)
print(response)
```
```js theme={null}
const tools = [
{
type: "function",
name: "get_current_weather",
description: "Get the current weather in a given location",
parameters: {
type: "object",
properties: {
location: {
type: "string",
description: "The city and state, e.g. San Francisco, CA"
},
unit: { type: "string", enum: ["celsius", "fahrenheit"] }
},
required: ["location", "unit"]
}
}
];
const response = await portkey.responses.create({
model: "gpt-4.1",
tools: tools,
input: "What is the weather like in Boston today?",
tool_choice: "auto"
});
console.log(response);
```
```python theme={null}
tools = [
{
"type": "function",
"name": "get_current_weather",
"description": "Get the current weather in a given location",
"parameters": {
"type": "object",
"properties": {
"location": {
"type": "string",
"description": "The city and state, e.g. San Francisco, CA"
},
"unit": {"type": "string", "enum": ["celsius", "fahrenheit"]}
},
"required": ["location", "unit"]
}
}
]
response = client.responses.create(
model="gpt-4.1",
tools=tools,
input="What is the weather like in Boston today?",
tool_choice="auto"
)
print(response)
```
```js theme={null}
const tools = [
{
type: "function",
name: "get_current_weather",
description: "Get the current weather in a given location",
parameters: {
type: "object",
properties: {
location: {
type: "string",
description: "The city and state, e.g. San Francisco, CA"
},
unit: { type: "string", enum: ["celsius", "fahrenheit"] }
},
required: ["location", "unit"]
}
}
];
const response = await openai.responses.create({
model: "gpt-4.1",
tools: tools,
input: "What is the weather like in Boston today?",
tool_choice: "auto"
});
console.log(response);
```
### Fine-Tuning
Please refer to our fine-tuning guides to take advantage of Portkey's advanced [continuous fine-tuning](/product/autonomous-fine-tuning) capabilities.
### Image Generation
Portkey supports multiple modalities for OpenAI and you can make image generation requests through Portkey's AI Gateway the same way as making completion calls.
```js theme={null}
// Define the OpenAI client as shown above
const image = await openai.images.generate({
model:"dall-e-3",
prompt:"Lucy in the sky with diamonds",
size:"1024x1024"
})
```
```python theme={null}
# Define the OpenAI client as shown above
image = openai.images.generate(
model="dall-e-3",
prompt="Lucy in the sky with diamonds",
size="1024x1024"
)
```
Portkey's fast AI gateway captures the information about the request on your Portkey Dashboard. On your logs screen, you'd be able to see this request with the request and response.
 More information on image generation is available in the [API Reference](/provider-endpoints/images/create-image#create-image).
### Audio - Transcription, Translation, and Text-to-Speech
Portkey's multimodal Gateway also supports the `audio` methods on OpenAI API. Check out the below guides for more info:
Check out the below guides for more info:
[Text-to-Speech](/product/ai-gateway/multimodal-capabilities/text-to-speech)
[Speech-to-Text](/product/ai-gateway/multimodal-capabilities/speech-to-text)
***
## Intergrated Tools with Repsponses API
### Web Search Tool
Web search delivers accurate and clearly-cited answers from the web, using the same tool as search in ChatGPT:
```python theme={null}
response = portkey.responses.create(
model="gpt-4.1",
tools=[{
"type": "web_search_preview",
"search_context_size": "medium", # Options: "high", "medium" (default), or "low"
"user_location": { # Optional - for localized results
"type": "approximate",
"country": "US",
"city": "San Francisco",
"region": "California"
}
}],
input="What was a positive news story from today?"
)
print(response)
```
```js theme={null}
const response = await portkey.responses.create({
model: "gpt-4.1",
tools: [{
type: "web_search_preview",
search_context_size: "medium", // Options: "high", "medium" (default), or "low"
user_location: { // Optional - for localized results
type: "approximate",
country: "US",
city: "San Francisco",
region: "California"
}
}],
input: "What was a positive news story from today?"
});
console.log(response);
```
**Options for `search_context_size`:**
* `high`: Most comprehensive context, higher cost, slower response
* `medium`: Balanced context, cost, and latency (default)
* `low`: Minimal context, lowest cost, fastest response
Responses include citations for URLs found in search results, with clickable references.
### File Search Tool
File search enables quick retrieval from your knowledge base across multiple file types:
```python theme={null}
response = portkey.responses.create(
model="gpt-4.1",
tools=[{
"type": "file_search",
"vector_store_ids": ["vs_1234567890"],
"max_num_results": 20,
"filters": { # Optional - filter by metadata
"type": "eq",
"key": "document_type",
"value": "report"
}
}],
input="What are the attributes of an ancient brown dragon?"
)
print(response)
```
```js theme={null}
const response = await portkey.responses.create({
model: "gpt-4.1",
tools: [{
type: "file_search",
vector_store_ids: ["vs_1234567890"],
max_num_results: 20,
filters: { // Optional - filter by metadata
type: "eq",
key: "document_type",
value: "report"
}
}],
input: "What are the attributes of an ancient brown dragon?"
});
console.log(response);
```
This tool requires you to first create a vector store and upload files to it. Supports various file formats including PDFs, DOCXs, TXT, and more. Results include file citations in the response.
### Enhanced Reasoning
Control the depth of model reasoning for more comprehensive analysis:
```python theme={null}
response = portkey.responses.create(
model="o3-mini",
input="How much wood would a woodchuck chuck?",
reasoning={
"effort": "high" # Options: "high", "medium", or "low"
}
)
print(response)
```
```js theme={null}
const response = await portkey.responses.create({
model: "o3-mini",
input: "How much wood would a woodchuck chuck?",
reasoning: {
effort: "high" // Options: "high", "medium", or "low"
}
});
console.log(response);
```
### Computer Use Assistant
Portkey also supports the Computer Use Assistant (CUA) tool, which helps agents control computers or virtual machines through screenshots and actions. This feature is available for select developers as a research preview on premium tiers.
Learn More about Computer use tool here
## Managing OpenAI Projects & Organizations in Portkey
When integrating OpenAI with Portkey, you can specify your OpenAI organization and project IDs along with your API key. This is particularly useful if you belong to multiple organizations or are accessing projects through a legacy user API key.
Specifying the organization and project IDs helps you maintain better control over your access rules, usage, and costs.
In Portkey, you can add your Org & Project details by,
1. Creating your Virtual Key
2. Defining a Gateway Config
3. Passing Details in a Request
Let's explore each method in more detail.
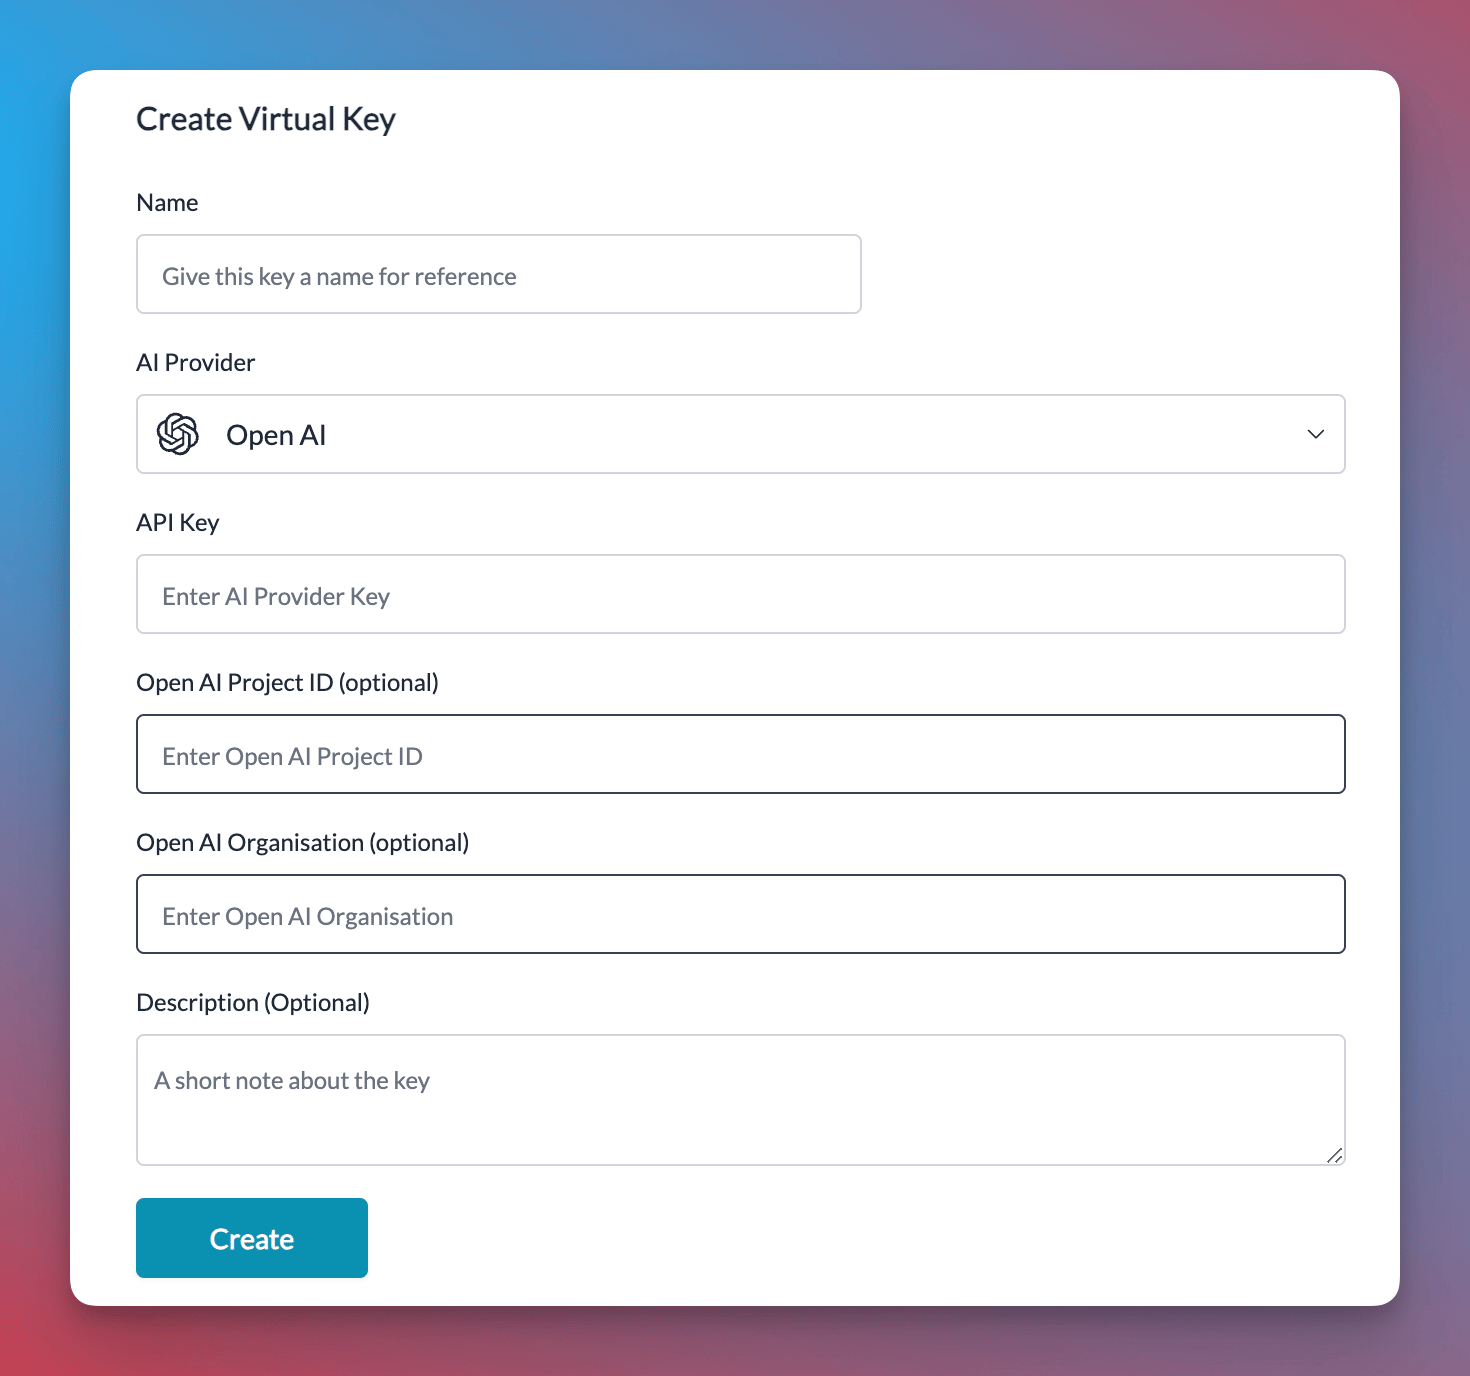
### Using Virtual Keys
When selecting OpenAI from the dropdown menu while creating a virtual key, Portkey automatically displays optional fields for the organization ID and project ID alongside the API key field.
[Get your OpenAI API key from here](https://platform.openai.com/api-keys), then add it to Portkey to create the virtual key that can be used throughout Portkey.
More information on image generation is available in the [API Reference](/provider-endpoints/images/create-image#create-image).
### Audio - Transcription, Translation, and Text-to-Speech
Portkey's multimodal Gateway also supports the `audio` methods on OpenAI API. Check out the below guides for more info:
Check out the below guides for more info:
[Text-to-Speech](/product/ai-gateway/multimodal-capabilities/text-to-speech)
[Speech-to-Text](/product/ai-gateway/multimodal-capabilities/speech-to-text)
***
## Intergrated Tools with Repsponses API
### Web Search Tool
Web search delivers accurate and clearly-cited answers from the web, using the same tool as search in ChatGPT:
```python theme={null}
response = portkey.responses.create(
model="gpt-4.1",
tools=[{
"type": "web_search_preview",
"search_context_size": "medium", # Options: "high", "medium" (default), or "low"
"user_location": { # Optional - for localized results
"type": "approximate",
"country": "US",
"city": "San Francisco",
"region": "California"
}
}],
input="What was a positive news story from today?"
)
print(response)
```
```js theme={null}
const response = await portkey.responses.create({
model: "gpt-4.1",
tools: [{
type: "web_search_preview",
search_context_size: "medium", // Options: "high", "medium" (default), or "low"
user_location: { // Optional - for localized results
type: "approximate",
country: "US",
city: "San Francisco",
region: "California"
}
}],
input: "What was a positive news story from today?"
});
console.log(response);
```
**Options for `search_context_size`:**
* `high`: Most comprehensive context, higher cost, slower response
* `medium`: Balanced context, cost, and latency (default)
* `low`: Minimal context, lowest cost, fastest response
Responses include citations for URLs found in search results, with clickable references.
### File Search Tool
File search enables quick retrieval from your knowledge base across multiple file types:
```python theme={null}
response = portkey.responses.create(
model="gpt-4.1",
tools=[{
"type": "file_search",
"vector_store_ids": ["vs_1234567890"],
"max_num_results": 20,
"filters": { # Optional - filter by metadata
"type": "eq",
"key": "document_type",
"value": "report"
}
}],
input="What are the attributes of an ancient brown dragon?"
)
print(response)
```
```js theme={null}
const response = await portkey.responses.create({
model: "gpt-4.1",
tools: [{
type: "file_search",
vector_store_ids: ["vs_1234567890"],
max_num_results: 20,
filters: { // Optional - filter by metadata
type: "eq",
key: "document_type",
value: "report"
}
}],
input: "What are the attributes of an ancient brown dragon?"
});
console.log(response);
```
This tool requires you to first create a vector store and upload files to it. Supports various file formats including PDFs, DOCXs, TXT, and more. Results include file citations in the response.
### Enhanced Reasoning
Control the depth of model reasoning for more comprehensive analysis:
```python theme={null}
response = portkey.responses.create(
model="o3-mini",
input="How much wood would a woodchuck chuck?",
reasoning={
"effort": "high" # Options: "high", "medium", or "low"
}
)
print(response)
```
```js theme={null}
const response = await portkey.responses.create({
model: "o3-mini",
input: "How much wood would a woodchuck chuck?",
reasoning: {
effort: "high" // Options: "high", "medium", or "low"
}
});
console.log(response);
```
### Computer Use Assistant
Portkey also supports the Computer Use Assistant (CUA) tool, which helps agents control computers or virtual machines through screenshots and actions. This feature is available for select developers as a research preview on premium tiers.
Learn More about Computer use tool here
## Managing OpenAI Projects & Organizations in Portkey
When integrating OpenAI with Portkey, you can specify your OpenAI organization and project IDs along with your API key. This is particularly useful if you belong to multiple organizations or are accessing projects through a legacy user API key.
Specifying the organization and project IDs helps you maintain better control over your access rules, usage, and costs.
In Portkey, you can add your Org & Project details by,
1. Creating your Virtual Key
2. Defining a Gateway Config
3. Passing Details in a Request
Let's explore each method in more detail.
### Using Virtual Keys
When selecting OpenAI from the dropdown menu while creating a virtual key, Portkey automatically displays optional fields for the organization ID and project ID alongside the API key field.
[Get your OpenAI API key from here](https://platform.openai.com/api-keys), then add it to Portkey to create the virtual key that can be used throughout Portkey.
 [Virtual Keys](/product/ai-gateway/virtual-keys)
Portkey takes budget management a step further than OpenAI. While OpenAI allows setting budget limits per project, Portkey enables you to set budget limits for each virtual key you create. For more information on budget limits, refer to this documentation:
[Budget Limits](/product/ai-gateway/virtual-keys/budget-limits)
### Using The Gateway Config
You can also specify the organization and project details in the gateway config, either at the root level or within a specific target.
```json theme={null}
{
"provider": "openai",
"api_key": "OPENAI_API_KEY",
"openai_organization": "org-xxxxxx",
"openai_project": "proj_xxxxxxxx"
}
```
### While Making a Request
You can also pass your organization and project details directly when making a request using curl, the OpenAI SDK, or the Portkey SDK.
```python theme={null}
from openai import OpenAI
from portkey_ai import PORTKEY_GATEWAY_URL, createHeaders
client = OpenAI(
api_key="OPENAI_API_KEY",
organization="org-xxxxxxxxxx",
project="proj_xxxxxxxxx",
base_url=PORTKEY_GATEWAY_URL,
default_headers=createHeaders(
provider="openai",
api_key="PORTKEY_API_KEY"
)
)
chat_complete = client.chat.completions.create(
model="gpt-4o",
messages=[{"role": "user", "content": "Say this is a test"}],
)
print(chat_complete.choices[0].message.content)
```
```js theme={null}
import OpenAI from "openai";
import { PORTKEY_GATEWAY_URL, createHeaders } from "portkey-ai";
const openai = new OpenAI({
apiKey: "OPENAI_API_KEY",
organization: "org-xxxxxx",
project: "proj_xxxxxxx",
baseURL: PORTKEY_GATEWAY_URL,
defaultHeaders: createHeaders({
provider: "openai",
apiKey: "PORTKEY_API_KEY",
}),
});
async function main() {
const chatCompletion = await openai.chat.completions.create({
messages: [{ role: "user", content: "Say this is a test" }],
model: "gpt-4o",
});
console.log(chatCompletion.choices);
}
main();
```
```sh theme={null}
curl https://api.portkey.ai/v1/chat/completions \
-H "Content-Type: application/json" \
-H "Authorization: Bearer $OPENAI_API_KEY" \
-H "x-portkey-openai-organization: org-xxxxxxx" \
-H "x-portkey-openai-project: proj_xxxxxxx" \
-H "x-portkey-api-key: $PORTKEY_API_KEY" \
-H "x-portkey-provider: openai" \
-d '{
"model": "gpt-4o",
"messages": [{"role": "user","content": "Hello!"}]
}'
```
```python theme={null}
from portkey_ai import Portkey
portkey = Portkey(
api_key="PORTKEY_API_KEY",
provider="openai",
Authorization="Bearer OPENAI_API_KEY",
openai_organization="org-xxxxxxxxx",
openai_project="proj_xxxxxxxxx",
)
chat_complete = portkey.chat.completions.create(
model="gpt-4o",
messages=[{"role": "user", "content": "Say this is a test"}],
)
print(chat_complete.choices[0].message.content)
```
```js theme={null}
import Portkey from "portkey-ai";
const portkey = new Portkey({
apiKey: "PORTKEY_API_KEY",
provider: "openai",
Authorization: "Bearer OPENAI_API_KEY",
openaiOrganization: "org-xxxxxxxxxxx",
openaiProject: "proj_xxxxxxxxxxxxx",
});
async function main() {
const chatCompletion = await portkey.chat.completions.create({
messages: [{ role: "user", content: "Say this is a test" }],
model: "gpt-4o",
});
console.log(chatCompletion.choices);
}
main();
```
***
### Portkey Features
Portkey supports the complete host of it's functionality via the OpenAI SDK so you don't need to migrate away from it.
Please find more information in the relevant sections:
1. [Add metadata to your requests](/product/observability/metadata)
2. [Add gateway configs to the OpenAI client or a single request](/product/ai-gateway/configs)
3. [Tracing OpenAI requests](/product/observability/traces)
4. [Setup a fallback to Azure OpenAI](/product/ai-gateway/fallbacks)
[Virtual Keys](/product/ai-gateway/virtual-keys)
Portkey takes budget management a step further than OpenAI. While OpenAI allows setting budget limits per project, Portkey enables you to set budget limits for each virtual key you create. For more information on budget limits, refer to this documentation:
[Budget Limits](/product/ai-gateway/virtual-keys/budget-limits)
### Using The Gateway Config
You can also specify the organization and project details in the gateway config, either at the root level or within a specific target.
```json theme={null}
{
"provider": "openai",
"api_key": "OPENAI_API_KEY",
"openai_organization": "org-xxxxxx",
"openai_project": "proj_xxxxxxxx"
}
```
### While Making a Request
You can also pass your organization and project details directly when making a request using curl, the OpenAI SDK, or the Portkey SDK.
```python theme={null}
from openai import OpenAI
from portkey_ai import PORTKEY_GATEWAY_URL, createHeaders
client = OpenAI(
api_key="OPENAI_API_KEY",
organization="org-xxxxxxxxxx",
project="proj_xxxxxxxxx",
base_url=PORTKEY_GATEWAY_URL,
default_headers=createHeaders(
provider="openai",
api_key="PORTKEY_API_KEY"
)
)
chat_complete = client.chat.completions.create(
model="gpt-4o",
messages=[{"role": "user", "content": "Say this is a test"}],
)
print(chat_complete.choices[0].message.content)
```
```js theme={null}
import OpenAI from "openai";
import { PORTKEY_GATEWAY_URL, createHeaders } from "portkey-ai";
const openai = new OpenAI({
apiKey: "OPENAI_API_KEY",
organization: "org-xxxxxx",
project: "proj_xxxxxxx",
baseURL: PORTKEY_GATEWAY_URL,
defaultHeaders: createHeaders({
provider: "openai",
apiKey: "PORTKEY_API_KEY",
}),
});
async function main() {
const chatCompletion = await openai.chat.completions.create({
messages: [{ role: "user", content: "Say this is a test" }],
model: "gpt-4o",
});
console.log(chatCompletion.choices);
}
main();
```
```sh theme={null}
curl https://api.portkey.ai/v1/chat/completions \
-H "Content-Type: application/json" \
-H "Authorization: Bearer $OPENAI_API_KEY" \
-H "x-portkey-openai-organization: org-xxxxxxx" \
-H "x-portkey-openai-project: proj_xxxxxxx" \
-H "x-portkey-api-key: $PORTKEY_API_KEY" \
-H "x-portkey-provider: openai" \
-d '{
"model": "gpt-4o",
"messages": [{"role": "user","content": "Hello!"}]
}'
```
```python theme={null}
from portkey_ai import Portkey
portkey = Portkey(
api_key="PORTKEY_API_KEY",
provider="openai",
Authorization="Bearer OPENAI_API_KEY",
openai_organization="org-xxxxxxxxx",
openai_project="proj_xxxxxxxxx",
)
chat_complete = portkey.chat.completions.create(
model="gpt-4o",
messages=[{"role": "user", "content": "Say this is a test"}],
)
print(chat_complete.choices[0].message.content)
```
```js theme={null}
import Portkey from "portkey-ai";
const portkey = new Portkey({
apiKey: "PORTKEY_API_KEY",
provider: "openai",
Authorization: "Bearer OPENAI_API_KEY",
openaiOrganization: "org-xxxxxxxxxxx",
openaiProject: "proj_xxxxxxxxxxxxx",
});
async function main() {
const chatCompletion = await portkey.chat.completions.create({
messages: [{ role: "user", content: "Say this is a test" }],
model: "gpt-4o",
});
console.log(chatCompletion.choices);
}
main();
```
***
### Portkey Features
Portkey supports the complete host of it's functionality via the OpenAI SDK so you don't need to migrate away from it.
Please find more information in the relevant sections:
1. [Add metadata to your requests](/product/observability/metadata)
2. [Add gateway configs to the OpenAI client or a single request](/product/ai-gateway/configs)
3. [Tracing OpenAI requests](/product/observability/traces)
4. [Setup a fallback to Azure OpenAI](/product/ai-gateway/fallbacks)